We may receive commissions from purchases made through links in this post, at no additional cost to you.
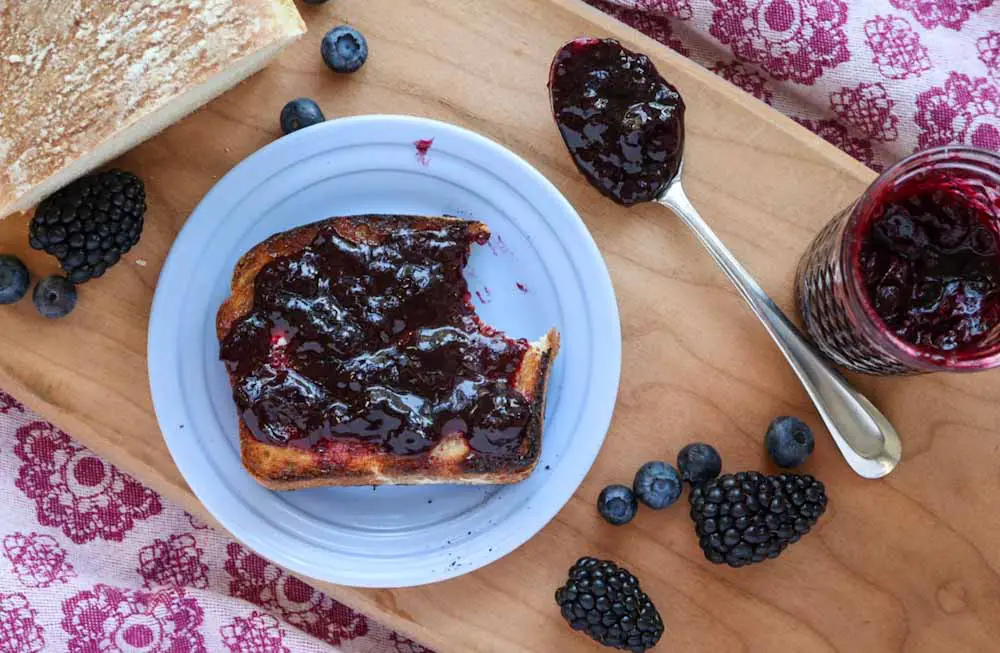
It really pays to learn which fruits grow well in your area, even if you don’t grow them yourself (although maybe you should…). Two winners in my hot, humid zone 8b climate are blackberries and blueberries. So, since they are available in abundance every summer, why not combine them into a dark, rich, tastes-just-like-fresh-berries jam?
I promise, no store-bought jam can compare with the flavor of my Black and Blue(berry) jam. But the best homemade preserves start with the best ingredients you can get. And the best berries are the ones that you have grown in your own home Fruit Grove (or, at least purchased from a local grower!).
When you make jam yourself, you are in control of the texture, sweetness, and quality of ingredients. Wherever you get your berries – whether it’s your own backyard, the farm down the street, or the produce aisle of the grocery store – there’s no better way to preserve their fresh flavor than homemade jam.
Growing Blackberries and Blueberries
Lots of climates are friendly to these fruits, however, not just my sunny, sometimes stiflingly hot area. Blackberries and blueberries both love acidic soil, full sun, and consistent watering. If you plant them in the right location, they need minimal extra care. You can even grow compact blackberry or blueberry bushes in pots if space is tight.
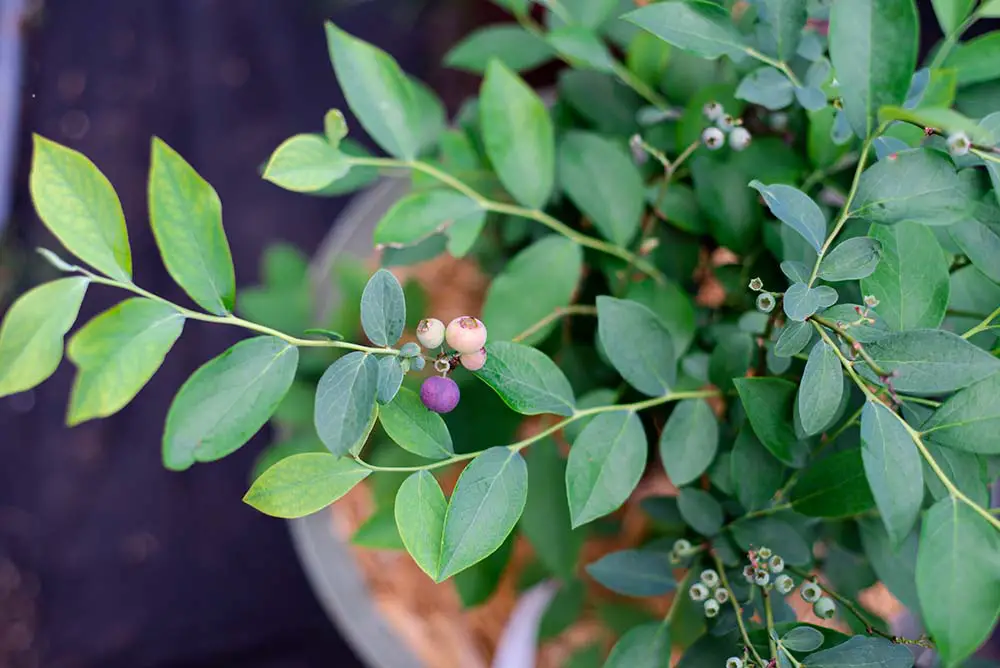
Both berries benefit from light yearly pruning and spring fertilizing. But truly, they are both good beginner fruits to grow. I’ve written many articles about growing blackberries and blueberries – here are just a few that may be helpful:
What makes this jam low sugar?
Most jam recipes have three or four times as much sugar as this one. I have found that when you pick quality fruit (or buy it), you need less sugar in the jam. In order to capture the fresh taste of the actual berries, I like to use as little sugar as possible.
For my Black and Blue Jam, I use brown sugar instead of white. You can absolutely substitute white sugar, but I love the subtle hint of molasses that the brown sugar adds. Blackberries and blueberries (along with other dark fruits like plums) have a natural richness, and the brown sugar plays that up perfectly.
Usually, jam needs lots of sugar in order to set properly. But, you can get away with adding far less sugar if you use Low-sugar or No-sugar Needed Pectin.
Pectin is simply a starch that occurs naturally in fruit that acts as a thickener and stabilizer for jams, jellies, and preserves. Some fruits, such as apples and citrus, have a lot of naturally occurring pectin – which is why you don’t typically need a thickener when making marmalade, for instance.
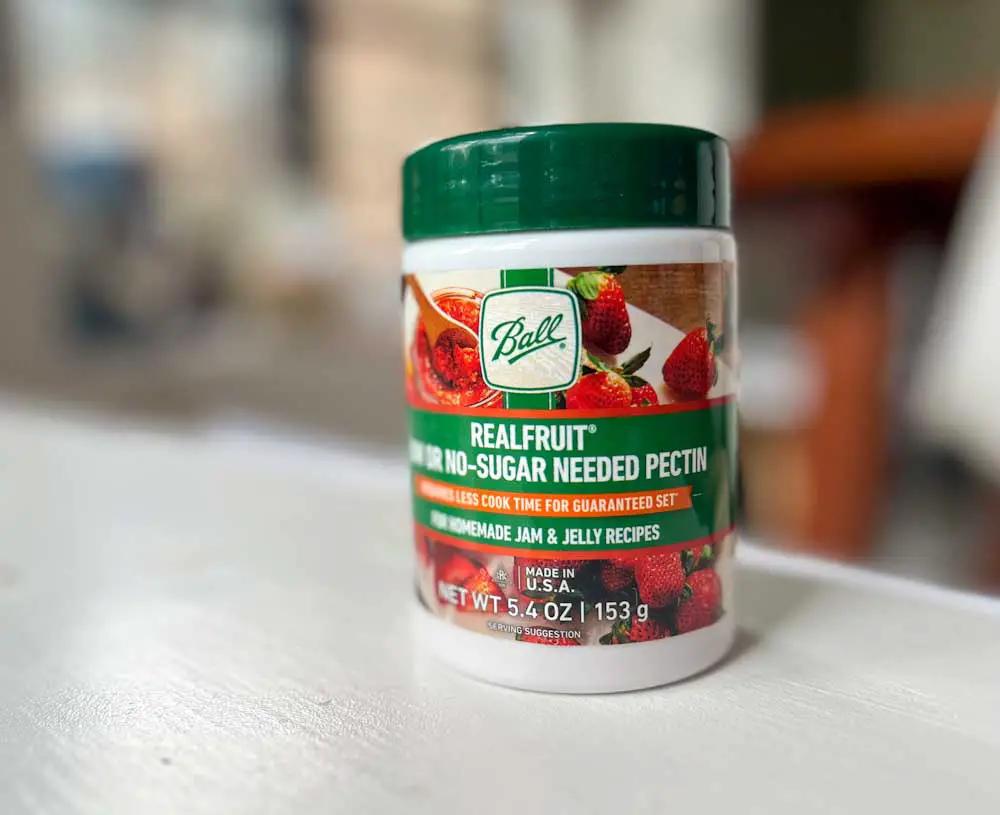
But berries and many other fruits either need tons of sugar and a long boiling time to set into jam, or they just need a little help from some added fruit pectin. The low-sugar pectin allows you to add just a little sugar and acidity (with lemon juice), but with minimal cooking time – which keeps the fresh flavor of the fruit intact. And since I went to all that trouble to grow my own berries, I definitely want to capture the actual taste of the fruit.
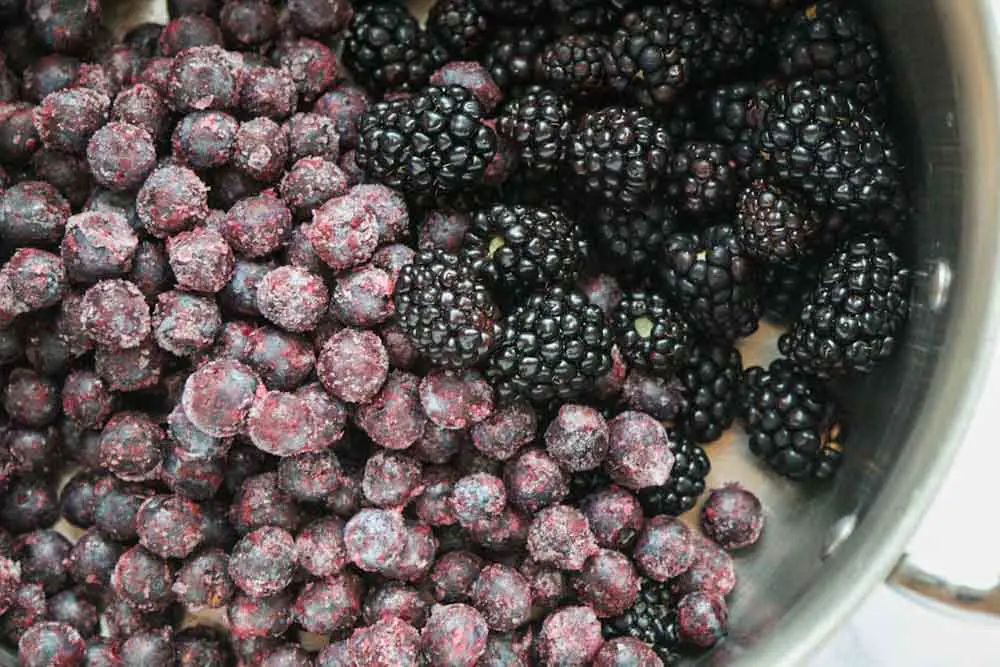
Can I use frozen berries?
Frozen berries are perfect to use in jam recipes like this one. Especially if the frozen berries are those that you stashed in the freezer from your own summer harvest (or a pick-your-own farm). That’s exactly what I do when we are picking a few pints of blackberries a day from our bushes. Or when we visit a nearby blueberry farm to pick bucketsful of berries.
To learn more about freezing fresh berries, check out my article: Freezing Blackberries: The Best Ways to Do It.
When making jam from frozen berries, you can either thaw the fruit overnight in the fridge, or just plop the frozen fruit right in a pot to thaw on the stove. Defrosted berries are much softer and release their juices very quickly, since the texture is broken down by the ice crystals. This is perfect for making low-sugar jam, since it means you don’t have to cook it long to soften the fruit.
Related: How to Thaw Blackberries/Raspberries for the Best Texture
If you want to remove the blackberry seeds from the jam (which I recommend), normally you have to cook the fresh berries first to soften them up before blending and straining. If you use frozen, defrosted blackberries, they will be soft enough to put right into the blender, saving a step.
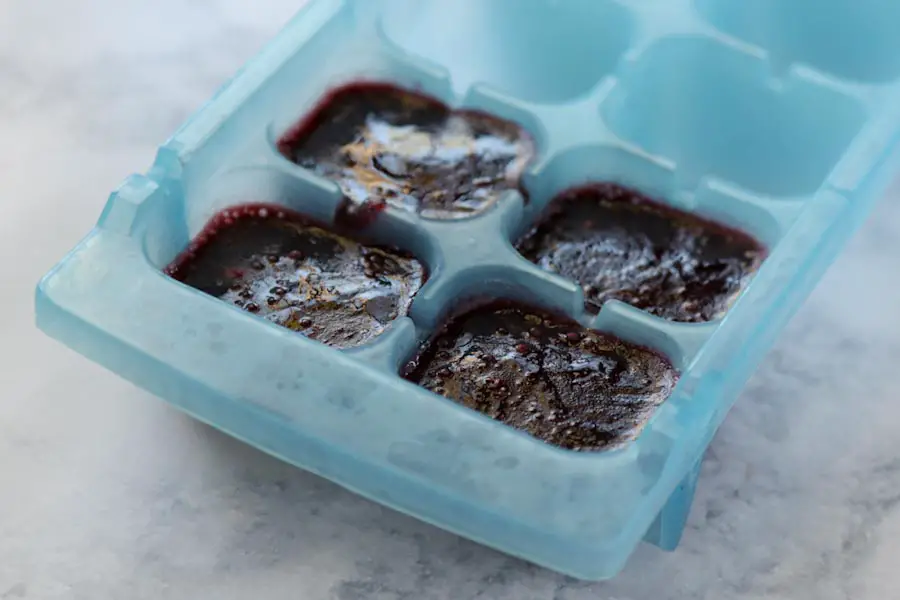
Another time saver – you can make and freeze a fresh blackberry puree in ice cube trays and keep it at the ready to use in desserts, smoothies, and – yes – jam. Find out how to make it (and other ways to freeze your berry harvest) here.
How do I know the jam is set?
The best way to know the jam is set is to test it – and taste it! I test the jell of my jam with cold spoons that I placed in the freezer before preparing the fruit. The hot jam cools quickly on the ice-cold spoon, which allows you to see how thick the jam is.
Simply scoop up a little jam on the frozen spoon and wait a few moments. When you tilt the spoon around, you should see that the jam looks thick, viscous, and has little wrinkles of surface tension around the edges. This jam is set!
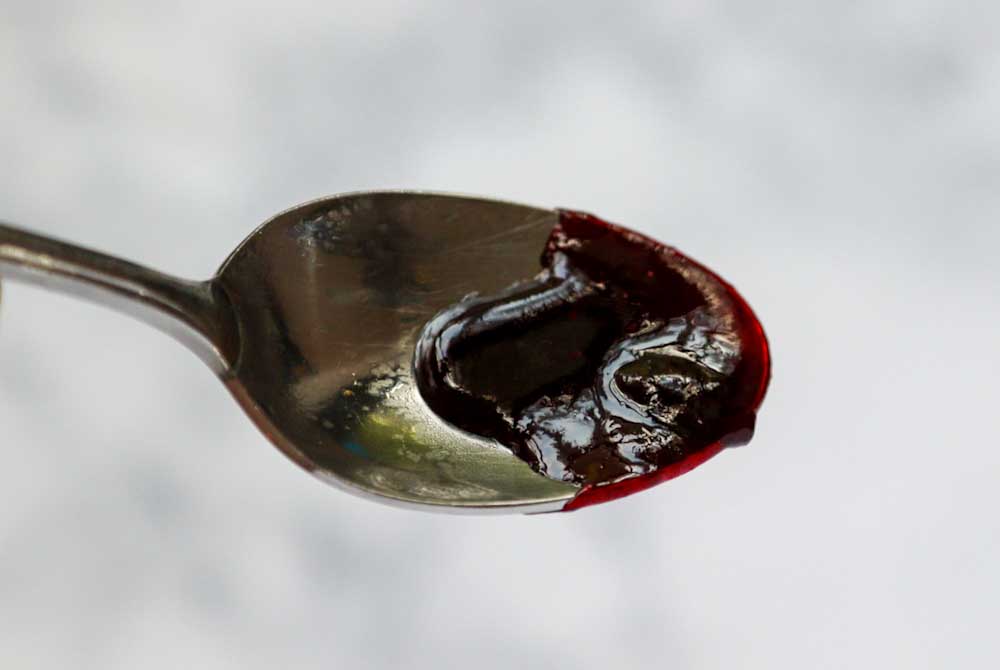
If the jam still looks really runny, add a little more pectin to the fruit mixture in the pot (one tablespoon at a time). Always bring the jam back to a boil after adding pectin. Check for jell again until you are happy with the texture. This recipe may need more pectin than other recipes since we are using minimal sugar.
Also – give the jam on the spoon a taste. This is your chance to check for sweetness. Even if the jam is still warm, you should be able to tell if it’s sweet enough for your taste. This depends largely on how sweet or tart the fruit is.
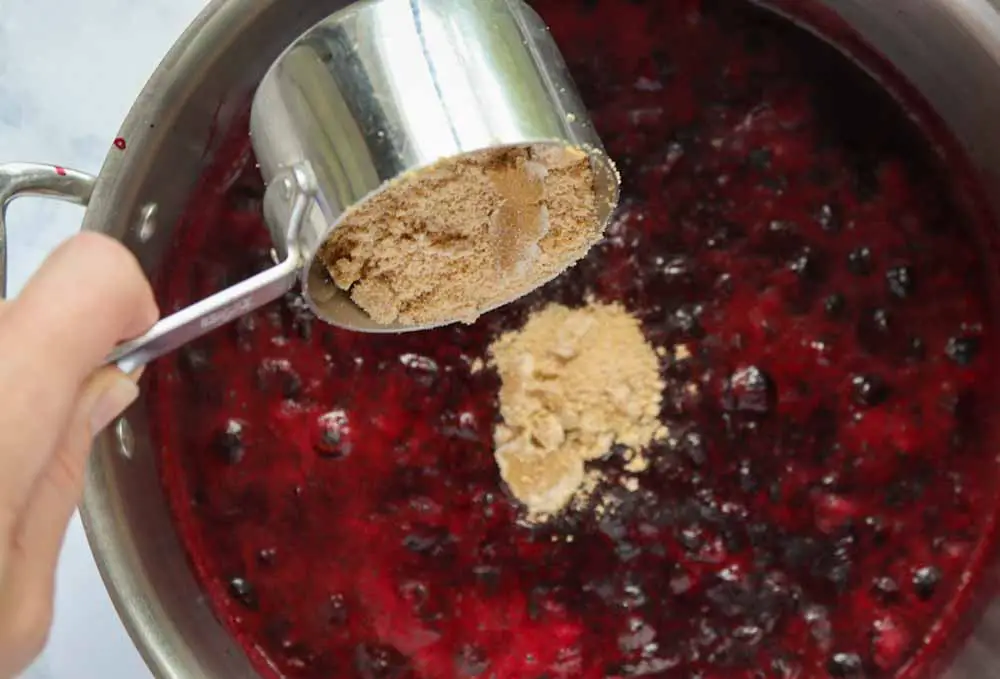
For this recipe, start with two cups of brown sugar, but you can add more sugar 1/4 cup at a time until the sweetness is just right. Again, boil the jam for a minute after each sugar addition to be sure it is dissolved.

Black and Blue(berry) Low-Sugar Jam
Equipment
- Large saucepan or pot
- Blender or immersion blender
- Fine mesh sieve
- Two metal spoons
- Ladle
- Jar funnel
- Jar tongs optional
- Large pot, water bath canner, or pressure canner optional
- Half-pint or pint glass jars and canning lids optional
Ingredients
- 6 cups of whole blueberries fresh or frozen
- 4 cups of whole blackberries fresh or frozen
- 2-2.5 cups of brown sugar
- ¼ cup of bottled lemon juice
- 3-4 tablespoons of low- or no-sugar pectin
Instructions
Make the jam:
- Set up canning equipment (optional). If you are canning the jam, first wash and/or sterilize the jars and rings. Keep the jars in hot water while you make the jam. Warm the flat lids in very hot (or simmering) water for about 5 minutes, and keep them warm until you’re ready to use them. Place two metal spoons in the freezer to use later (to check the jam’s consistency).
- Prepare the fruit. Wash the berries thoroughly. To remove seeds from the blackberries (optional), place them in a saucepan with 2 tbsp of water. Bring to a simmer over medium heat and cook for 3-5 minutes until the fruit softens and the juice is released. Use a fork or potato masher to help break up the berries. Transfer the cooked blackberries to the blender, and pulse until mostly smooth. Push the blackberry puree through a fine mesh sieve to remove the seeds; discard the seeds.
- Put the seedless blackberry puree back into the saucepan with the blueberries (if you decide to skip removing the blackberry seeds, put all the whole berries into the pot together with 2 tablespoons of water). Bring to a simmer over medium heat and cook for about 5 minutes, until the berries have softened and released their juice. Use a fork or potato masher to help the berries break down.
- Carefully transfer the cooked berries to the blender, and pulse until the fruit is at the desired consistency. I recommend blending the fruit until it is somewhat smooth, but still has some texture. Pour the fruit puree back into the saucepan. Or use an immersion blender right in the pot to blend the fruit to the right consistency.
- Make the jam. In a small bowl, mix 3 tablespoons of pectin with about ¼ cup of the measured brown sugar. Add the pectin/sugar mixture and the lemon juice to the fruit puree in the pot and bring to a boil, stirring constantly to prevent burning. Boil for 1 minute.
- Add the remaining brown sugar to the fruit mixture (start with a total of 2 cups, then add more if the jam needs extra sweetness). Stir to remove any clumps, then bring back to a full boil. Boil for 1 minute to ensure the sugar is completely dissolved.
- Check for jell. Remove one of the spoons from the freezer. Scoop up a little of the hot jam and cool it for a few moments on the spoon. If the jam thickens up and looks viscous and a little wrinkly around the edges of the spoon, then it has set. If the jam still looks too runny, add the last tablespoon of pectin into the pot and bring back to a boil. Check for jell again with the other spoon. Taste the jam for sweetness and add extra sugar if desired (always bring the jam back to a boil to make sure the sugar is dissolved).
- Using a jar funnel, carefully ladle the jam into the jars. Store it in the refrigerator for up to two weeks. Or, put the jam into freezer-safe containers and freeze for up to three months.
Canning Instructions:
- Ladle the hot jam into hot, sterile jars, leaving ½ inch of head space between the jam and the top of the jar. You can use jars that haven’t been sterilized (as long as they are clean and still hot), but the processing time will be longer. Once the jars are filled, wipe the rims with a damp paper towel to ensure that there is no jam residue that can interfere with the seal. Place the warm lids on the jars, and screw on the rings until secure, but not too tight.
- Process the full jars in a large pot of boiling water that is at least one inch over the top of the jar lids. Boil for 5 minutes if using sterilized jars, or 10 minutes if using clean (but not sterile) jars. If you live at high elevation (over 1,000 feet), add 1 minute of boiling time for each 1,000 feet over sea level.
- After processing, turn off the heat and allow the jars to sit in the hot water for about 5 minutes to let the contents settle. Remove the jars carefully from the pot with jar tongs, and place them on a towel on the counter (you don’t want to put the hot jars directly on a cool surface). Allow them to cool at room temperature for 12-24 hours. If any jars are unsealed after 24 hours, put them in the refrigerator to be eaten first. Store sealed, unopened jam in a cool, dark place for 6 months to a year.
TIPS
- This recipe works with any ratio of blueberries and blackberries. You could use half and half, but I prefer it with slightly more blueberries, since they have a milder sweetness. But if you have more black than blue, that’s just fine!
- To make this recipe from frozen fruit, simply allow the fruit to defrost overnight. Defrosted fruit is much softer than fresh fruit, since the ice crystals break down the texture. If you use frozen and defrosted blackberries for this recipe, there’s no need to cook the berries before pureeing and straining out the seeds. Simply dump the defrosted berries straight into the blender and puree them. Once strained, add the puree to the pot with the blueberries and proceed with the instructions.
